wBuild
Overview
wBuild is all about making your day easier resolving, updating and cascading various dependencies, pipeline rules and
code structs. The program lets you specify all the needed information in a YAML header right in your R code and let
the automated Snakemake processes do the rest!
You can learn more about the features that wBuild provides either taking a look at the features list or looking at the HTML output of the demo project. Another interesting thing to take a look at could be the installation requirements & procedure and, in particular, wBuild project tree structure.
You can find functionality overview of wBuild and its relationship with Snakemake here.
Example
First, we install all the needed software requirements, including wBuild. Then, we initialize wbuild which creates wBuild files in our project.
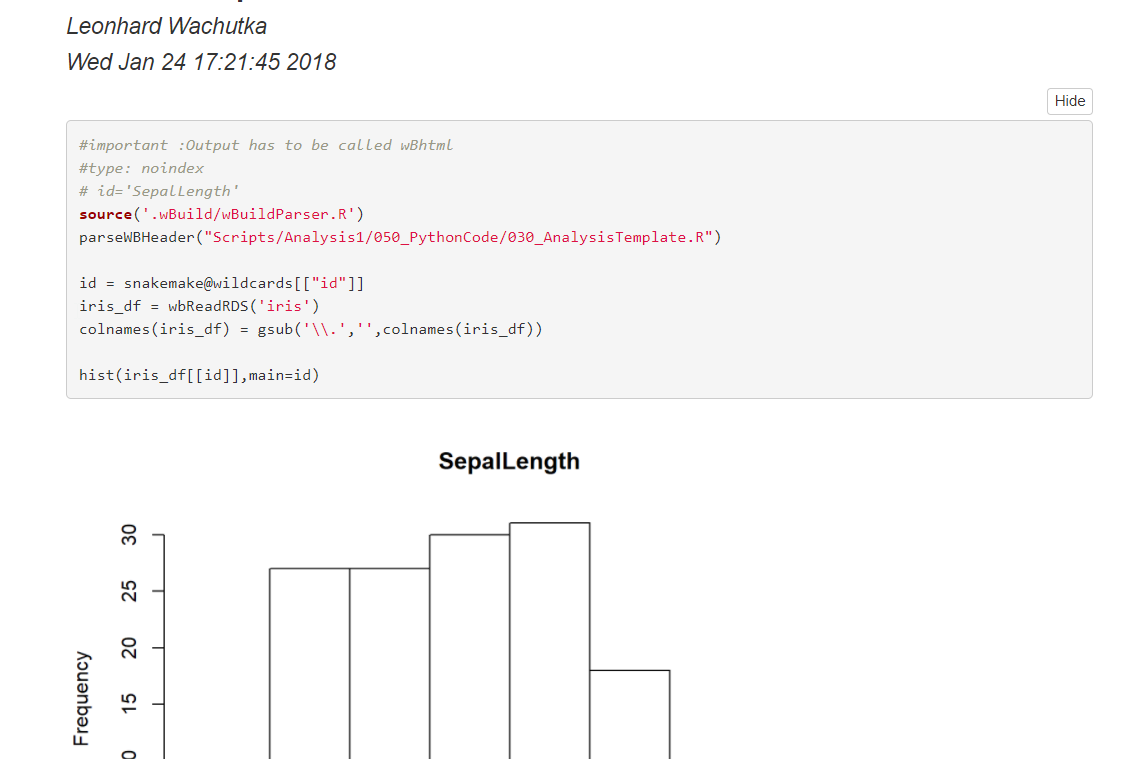
After that, we create an R script in the and provide a YAML header with wBuild-supported tags:
#'---
#' title: Basic Input Demo
#' author: Leonhard Wachutka
#' wb:
#'  input:
#'  - iris: "Data/{wbP}/iris.RDS"
#'  output:
#'  - wBhtml: "Output/html/030_AnalysisOfId_{id}.html"
#'  type: noindex
#' output:
#'  html_document:
#'   code_folding: show
#'   code_download: TRUE
#'---

source('.wBuild/wBuildParser.R')
parseWBHeader("Scripts/Analysis1/050_PythonCode/030_AnalysisTemplate.R")

id = snakemake@wildcards[["id"]]
iris_df = wbReadRDS('iris')
colnames(iris_df) = gsub('\\.','',colnames(iris_df))
hist(iris_df[[id]],main=id)
Running snakemake now in the root directory of your project will now automatically
parse the parameters out of scripts headers and create an HTML output showing the results of our petal analysis - found in HTML output directory
(./Output/html by default) along with a nice navigable HTML structure. Let’s open one of the output HTML files, use the
upper footer to navigate to the needed subproject (here Analysis1), and we will see a nicely rendered output of our
script:
You can read more about publishing the output HTML to your common server or try launching demonstration yourself as follows:
Running demo
- Install wBuild. You can learn more about the installation process here.
- Navigate to an empty directory.
- Run
wbuild demo. This will create a wBuild demo project with various examples. - Explore the files in
Scripts/ - Run
snakemakeon the root directory to let Snakemake do its thing (see below) and compile the project. - Open
Output/html/index.htmlin your web browser. From there, you can browse through sites showing and describing basic features of wBuild on an example analysis.
Functionality & workflow
wBuild is not really a standalone application, much more a plugin and “code generator” for the later use of Snakemake, which is inevitable part
of a workflow involving wBuild: this way, you run snakemake CLI each time you want to build and render your project!
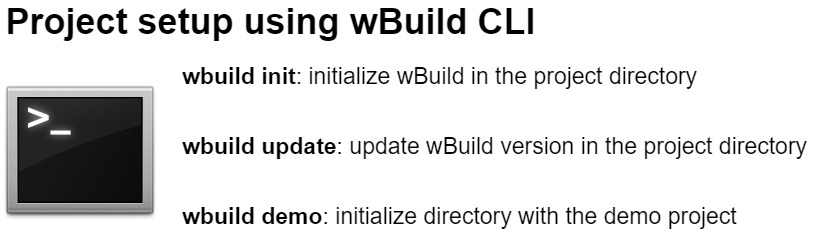
First, wBuild executes the initial, setup part of the workflow:
After that comes the project build phase. During this step, snakemake with a help of wBuild does process your project and creates the results. Following diagram shows the process:
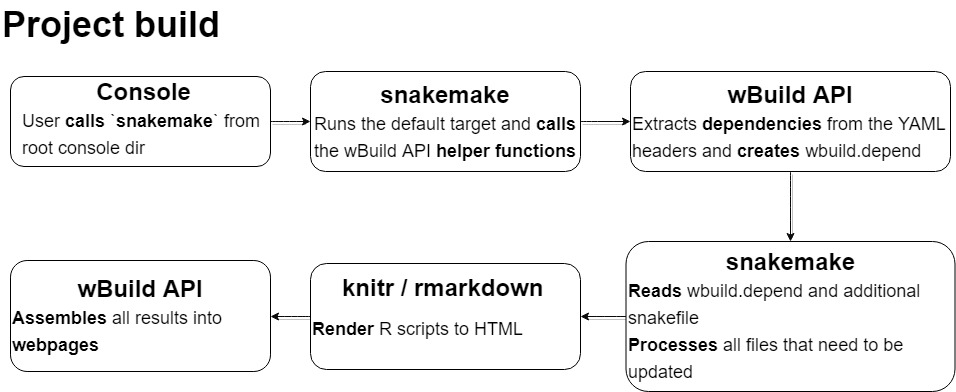
As you see, Snakemake actually takes the main role in a typical wBuild workflow, so every user is encouraged to learn more about Snakemake - for instance in its official documentation. You are also welcome to take a look at the more technial features that wBuild provides.
A small overview of the functionality that wBuild provides:
- wBuild enables reproducible research by appending every R-markdown script to the global analysis pipeline written in snakemake
- All R scripts using R-markdown are compiled via knitr/Rmarkdown and rendered in a navigable web-page
- This is achieved by writing the snakemake rules directly in the header of your R scripts
- Headers allow the same flexibility (i.e. usage of python) as in the traditional Snakefile, but do not separate dependencies from the code where they are actually used.
wBuild project structure
Assert ROOT is the root directory of your wBuild project.
- ROOT/.wBuild
- Is a directory with static wBuild files that is not to be changed unless necessary. There are all the service files located.
- ROOT/wbuild.yaml
- It is a configuration file. Necessary but editable by the user. See configuration file.
- ROOT/.wBuild.depend
- File autogenerated by wBuild. Contains rule information for the Snakemake pipeline.
- ROOT/Scripts
- Is a directory where all your scripts should be located within subdirectories. Organizing your code directly into subdirectories helps you to flexibly structure your project, to present them divided by tabs in the HTML output or to apply the same script to the various equally structured data
- ROOT/Output
- Is a default output directory. It’s subdirectories,
htmlandProcessedData, are paths for published html and processed data by default (you can change it).